



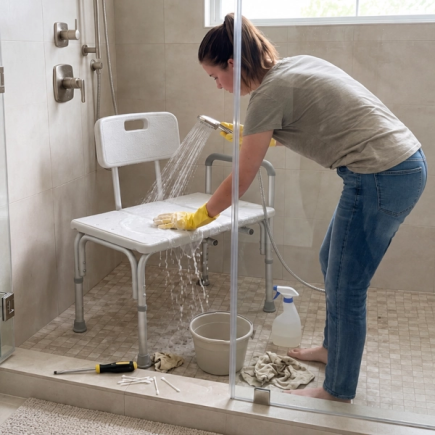























A shower chair provides extra support and comfort during bathing, but regular exposure to water, soap and body oils can leave residue on its seat, frame and joints. Moisture trapped in small openings can also cause unpleasant odours and encourage mold growth.
Knowing how to clean a shower chair correctly helps maintain hygiene, protect its materials and keep it in good condition. This guide explains which cleaning products to use, how to clean different chair components, how to treat common stains and when disinfection may be necessary.
Check Your Shower Chair Before Cleaning
Before choosing a cleaning method, identify the materials used in your chair. A typical shower chair may have an aluminium frame, a plastic seat, rubber feet and adjustable legs. Padded seats, fabric covers and other components may require different care.
Check the following areas:
- Frame and seat: Identify whether the surfaces are aluminium, coated metal, plastic or another material. Check the manufacturer’s instructions for compatible cleaning products.
- Joints and adjustment holes: Look for trapped water, soap residue and visible deposits around connections and height-adjustment pins.
- Rubber feet: Check for cracks, looseness, wear or hardened rubber that could affect grip.
- Removable components: Confirm whether the seat, caps, plugs or padding can be removed safely before attempting to clean underneath them.
If the frame is cracked, the feet are damaged or the chair feels unstable, stop using it until the problem has been resolved. Cleaning cannot repair structural damage.
Tools and Cleaning Products You’ll Need
Gather your supplies before starting so you can clean each section without leaving detergent or disinfectant on the chair for longer than the product instructions allow.
| Essential supplies | Purpose |
| Mild washing-up liquid | Removes everyday dirt, body oils and soap residue. |
| Warm water | Helps loosen ordinary grime without exposing materials to excessive heat. |
| Soft sponge or microfibre cloth | Cleans the seat, frame and other accessible surfaces. |
| Soft-bristled toothbrush | Reaches narrow gaps, joints and adjustment holes. |
| Clean towel | Removes surface moisture after rinsing. |
| Gloves | Help protect your hands when cleaning. |
You may also need a compatible bathroom cleaner or disinfectant if ordinary washing does not address the problem or disinfection is required. Choose products according to the chair manufacturer’s instructions and the product label.
Avoid: Steel wool, abrasive pads, harsh powders and unapproved solvents. These can scratch plastic, damage coatings or affect rubber components. Do not mix cleaning products, and never use a tool to remove caps or plugs unless the manufacturer permits it.
Step-by-Step: How to Clean a Shower Chair
Step 1: Prepare the Chair and Cleaning Area
Place the chair in a suitable area where you can access all its surfaces safely. If it is safe to move, position it in a well-ventilated bathroom or another appropriate cleaning area. Wear gloves if needed and read the instructions for any cleaning product you intend to use.
Inspect the chair for visible dirt, loose fasteners, damaged feet and cracks. If removable components are designed to come off, follow the manufacturer’s instructions before removing them.
Tip: Take a photograph before removing any approved detachable components so you can reassemble them correctly.
Step 2: Remove Loose Dirt and Hair
Rinse the chair with lukewarm water if its care instructions permit it. Remove loose hair, soap flakes and other debris from the seat and backrest openings.
Use your fingers or a soft brush to clear accessible areas without forcing debris deeper into the frame. Avoid directing water into sealed joints or components that are not designed to be rinsed.
Tip: If water collects inside the legs, check the manufacturer’s instructions for the correct drainage method rather than leaving it trapped.
Step 3: Wash the Seat, Frame and Attachments
Mix a small amount of mild washing-up liquid with warm water, following the product instructions. Dip a soft sponge or microfibre cloth into the solution and wring out the excess.
Clean the chair in this order:
- Seat and backrest: Wipe the upper surfaces, edges and underside to remove body oils and everyday grime.
- Armrests and handles: Clean the areas frequently touched by the user’s hands.
- Frame and joints: Wipe along the frame, paying attention to connections and height-adjustment points.
- Rubber feet: Remove dirt from the exterior without stretching, loosening or damaging the rubber.
For stubborn residue, gently scrub with a soft-bristled brush. Rinse the cloth as it becomes dirty so you do not spread grime across the chair.
Tip: Work on one section at a time and rinse away the detergent according to the chair’s care instructions.
Step 4: Clean Small Holes and Narrow Gaps
Seat openings, adjustment holes and joints can collect residue that is difficult to reach with a standard sponge.
Use the following method:
- Dip a soft toothbrush in the prepared soapy water and gently scrub around accessible openings.
- Use a clean cotton swab for narrow areas that the brush cannot reach.
- Clean around height-adjustment pins without forcing them out of position.
- If the manufacturer permits water to pass through the hollow legs, rinse those areas carefully.
- Drain accessible openings and prepare them for thorough drying.
Tip: Do not insert sharp objects into holes or remove plugs that are not designed to be detached. If dirt remains inside an inaccessible section, consult the manufacturer rather than dismantling the chair.
Step 5: Rinse Away Cleaning Residue
Rinse the cleaned surfaces with clean water where the manufacturer’s instructions permit it. Pay particular attention to the underside of the seat, armrests, joints and areas where detergent may collect.
If the chair has hollow legs that can safely be rinsed, follow the approved drainage procedure to remove residual water.
Tip: Check the surfaces for slippery detergent residue. If any remains, repeat the rinsing process as directed by the cleaning product and chair instructions.
Step 6: Disinfect When Necessary
Cleaning removes dirt and organic residue, while disinfection uses a suitable product to reduce microorganisms on a surface. Disinfection may be appropriate after contamination, illness or when required by a care setting’s infection-control procedures.
To disinfect a shower chair:
- Confirm that the product is labelled for the intended surface and compatible with the chair’s materials.
- Clean away visible dirt before applying the disinfectant.
- Apply the product according to its label, using the stated dilution if one is required.
- Keep the surface wet for the full contact time specified on the label.
- Rinse afterwards if the product instructions require it, then dry the chair completely.
Ventilate the room and never combine disinfectants with vinegar, bleach, descalers or other cleaning products.
Tip: Do not assume that every bathroom cleaner is a disinfectant. Check the product label for its intended use and follow the manufacturer’s guidance for the chair.
Step 7: Dry and Check the Chair Before Reuse
Use a clean towel to dry the seat, backrest, armrests and accessible frame surfaces. Pay particular attention to joints, adjustment holes and other areas where moisture may remain.
Allow the chair to air-dry completely in a well-ventilated location. Refit any approved removable components and make sure they are secured correctly.
Before using the chair again, check that:
- The height-adjustment pins are fully engaged.
- All fasteners and approved removable components are secure.
- The rubber feet are clean, intact and positioned correctly.
- The chair stands evenly without wobbling.
Tip: Do not use the chair until it is dry and any stability or damage concerns have been resolved.
How to Remove Stains, Mineral Deposits and mold
If marks remain after routine washing, identify the likely cause before selecting another treatment. The colour of a deposit does not always reveal what caused it, so begin with the gentlest suitable method.
1. Soap Scum and Greasy Residue
Soap scum and body oils can leave a dull or slippery film on plastic seats, armrests and backrests.
Treatment: Mild washing-up liquid and warm water.
How to apply it:
- Prepare fresh soapy water according to the detergent instructions.
- Apply it with a soft sponge or cloth to the affected area.
- Gently scrub persistent residue with a soft-bristled brush.
- Rinse thoroughly and inspect the surface.
- Repeat if necessary, then dry the area.
If the residue remains, use a bathroom cleaner specifically approved for the chair’s material. Follow the product label rather than increasing its concentration or scrubbing aggressively.
2. White, Chalky Deposits
White deposits may come from hard-water minerals or dried cleaning products. These marks can build up around joints, fasteners and areas where water evaporates.
Treatment: Mild detergent first, followed by a compatible descaler if needed.
How to apply it:
- Wash the affected area with mild detergent and water.
- Rinse and check whether the deposit remains.
- If it does, confirm that the manufacturer permits a suitable descaling product on that surface.
- Apply the product according to its instructions, including any specified contact time.
- Rinse as directed and dry the area completely.
Tip: Do not apply vinegar or acidic descalers to aluminium unless the chair manufacturer explicitly confirms that they are suitable. An incompatible product may damage the finish or other components.
3. Orange or Pink Film
Orange or pink film can result from different types of residue, mineral deposits or microbial growth. Colour alone cannot establish the cause.
Treatment: Mild detergent, water and a soft brush.
How to apply it:
- Wash the affected surface with soapy water.
- Gently scrub the film without scratching the plastic or damaging the frame’s finish.
- Rinse and inspect the area.
- If the film persists or returns quickly, consult the manufacturer’s guidance before choosing a specialist treatment.
- Dry the chair thoroughly to reduce moisture accumulation.
Avoid automatically using vinegar or another acidic treatment simply because a deposit is orange or pink. Check compatibility with nearby metal, coatings and rubber components first.
4. Black Spots or Suspected mold
Black spots may indicate mold, but their appearance alone is not enough to identify the cause. Check for persistent dampness and inspect accessible joints and other areas where water may collect.
Treatment: Detergent and water for suitable hard, non-porous surfaces, followed by complete drying.
How to apply it:
- Ventilate the area and wear suitable protective gloves.
- Wash the affected surface with mild detergent and water.
- Gently scrub with a soft brush without scratching the material.
- Rinse where appropriate and dry the area thoroughly.
- If additional disinfection is necessary, use a compatible product according to its label.
Tip: If mold persists, returns repeatedly or appears inside inaccessible components, seek the manufacturer’s advice. Replace any damaged part that cannot be cleaned adequately, and do not continue using a chair whose structural integrity is compromised.
5. Lingering Odours
An unpleasant smell may come from trapped water, accumulated residue or buildup inside accessible openings.
Treatment: Mild detergent, clean water and thorough drying.
How to apply it:
- Wash the seat, underside, joints and accessible openings.
- Check for trapped water in the adjustable legs and other hollow sections.
- Flush accessible openings only if the manufacturer permits it.
- Drain the water and dry accessible areas with a clean cloth.
- Allow the chair to air-dry fully before storing or using it.
Tip: If the smell remains after cleaning and drying, inspect for concealed buildup or damaged components and contact the manufacturer for advice.
How Often Should You Clean a Shower Chair?
The appropriate cleaning frequency depends on how often the chair is used, whether it is shared and whether additional infection-control measures are required.
| Situation | Routine care | Additional cleaning |
| One person using the chair daily | Remove visible residue and allow the chair to dry after use. | Clean regularly, such as weekly, and whenever visibly dirty. |
| Chair shared by multiple users | Clean between users according to the chair’s instructions and relevant hygiene requirements. | Disinfect between users when required by the care setting or infection-control guidance. |
| After illness or contamination | Do not rely on rinsing alone. | Clean and disinfect with a compatible product according to its label and relevant guidance. |
| Hard-water area | Wipe away water and residue after use. | Remove mineral deposits when they appear using an approved treatment. |
These are practical starting points, not universal guarantees of hygiene. Follow any specific care instructions or healthcare requirements that apply to the user.
Common Shower Chair Cleaning Mistakes to Avoid
Avoid these mistakes to protect the chair and reduce unnecessary cleaning risks.
- Using incompatible chemicals: A product that works on bathroom tiles may damage aluminium, plastic coatings or rubber feet.
- Mixing cleaning products: Combining chemicals can release hazardous fumes or cause dangerous reactions.
- Scrubbing with abrasive materials: Steel wool and rough pads can scratch surfaces and damage finishes.
- Ignoring narrow openings: Accessible holes and joints can retain residue and moisture if they are not cleaned properly.
- Removing components without checking: Forcing off caps or plugs can damage the chair and affect its stability.
- Leaving the chair damp: Trapped moisture can contribute to odours and recurring growth.
- Skipping the final safety check: Damaged feet, loose fasteners and improperly secured adjustment pins can compromise stability.
Storage and Maintenance
Good storage habits help prevent moisture buildup between cleaning sessions.
After use, remove visible residue and allow the chair to dry in a ventilated area. Avoid placing it in a closed cupboard while damp. If it must be stored elsewhere, make sure it is completely dry first.
Inspect the chair regularly for loose fasteners, worn rubber feet, damaged plastic, corrosion and problems with the height-adjustment mechanism. Follow the manufacturer’s maintenance instructions and replace components only with compatible parts.
If the chair becomes unstable or develops structural damage, stop using it until it has been repaired or replaced appropriately.
Keep Your Shower Chair Clean and Ready to Use
Maintaining a shower chair does not require a complicated collection of cleaning products. Mild detergent, suitable tools and thorough drying are enough for much of the routine work. More specialised treatments should be selected according to the type of deposit and the chair’s materials.
For additional support during bathing, you can also explore our bath stools and shower seating options, checking the product specifications to find a design that suits your needs.
FAQs
Bleach should only be used if the chair manufacturer and product label confirm that it is suitable. It may damage certain metals, coatings or rubber components. Never mix bleach with vinegar, ammonia or other cleaners. For routine cleaning, start with mild detergent and water, then rinse and dry the chair.
Disinfection frequency depends on how the chair is used and whether infection-control measures are needed. Clean regularly and disinfect after contamination or when required by the care setting. Always use a compatible product, follow its contact-time instructions and rinse afterwards if directed.
Use the chair only after the cleaning process is complete, the surfaces are dry and any required disinfectant contact time and rinsing instructions have been followed. Check that the rubber feet are secure, the height pins are locked and the chair stands firmly without wobbling before anyone sits down.