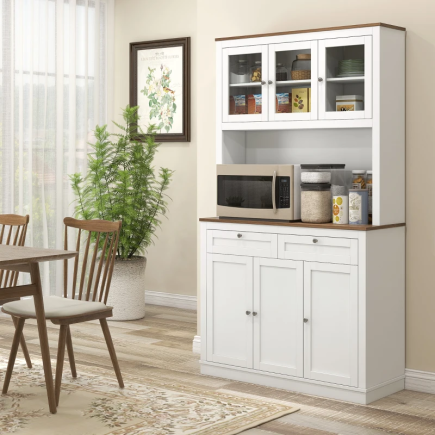
The HOMCOM 63″ Kitchen Pantry Cabinet (835-540V81TN) offers versatile storage with five tiers of shelving hidden behind sleek doors. Perfect for storing dinnerware, dry goods, or kitchen essentials, its tall design maximizes vertical space while keeping items neatly organized.
Estimated Assembly Time: 120 minutes
Recommended Assembler(s): 2 adults
Warning and Safety Instructions
- Assemble on a flat, stable, dry surface to prevent misalignment.
- Do not confuse similar screws double-check sizes before use.
- Do not fully tighten bolts until all panels are connected.
- Keep packaging and small parts away from children and pets.
- Always use two adults to lift and assemble tall panels safely.
- Do not exceed the weight capacity of shelves.
- Keep away from damp areas, flames, and direct heat.
- Always secure the cabinet to the wall using the included anti-tip kit.
- Avoid overtightening screws, which may damage wood panels.
Unboxing Your Pantry Cabinet: What’s Inside
Panels & Parts

How to Assemble Your Pantry Cabinet
It’s time to assemble your HOMCOM 63″ Kitchen Pantry Cabinet (835-540V81TN) just carefully follow these steps and go ahead.
Step 1: Preparing Side Panels

- Lay down panels ② and ③ on a flat surface.
- Insert hardware A (x12, Ø6×35mm) into all marked pre-drilled holes.
- Double-check each bolt is fully seated but do not overtighten.
Step 2: Attach Brackets to Top Panel

- Take panel ① (top panel).
- Position two brackets G at the marked holes on the underside.
- Secure each bracket using the provided screws (x4).
- Ensure both brackets are aligned evenly before tightening.
Step 3: Attach Dividers to Bottom Panel

- Take panel ② (bottom panel).
- Insert dowels C (x6) into the pre-drilled holes on the top surface of panel ②.
- Position dividers ⑤ onto the dowels.
- Secure each divider with cam locks B (x6) into the pre-installed bolts.
- Ensure the dividers are firmly fixed and aligned upright.
Step 4: Connect Back Panel and Dividers

- Take panel ③ (back panel) and panel ⑨.
- Insert dowels C (x10) into the pre-drilled holes on panel ③ and the dividers ⑤.
- Position the back panel ③ upright, aligning it with the dowels in dividers ⑤ and bottom panel ②.
- Secure all connections using cam locks B (x6).
- Ensure dividers and back panel are tightly fixed and square.
Step 5: Attach the Side Panel

- Take side panel ① and position it against the structure.
- Insert dowels C (x4) into the pre-drilled holes of side panel ①.
- Align side panel ① with panels ②, ③, and dividers ⑤.
- Secure the connection by tightening screws D (x4) through the side panel into the structure
Step 6: Insert Wooden Dowels

- Take dowels F (x6).
- Insert the dowels into the pre-drilled holes on panels ②, ③, ⑤, and ⑨ as shown.
- Use a hammer gently if needed to ensure the dowels are fully seated.
- Double-check that all dowels are flush and straight for a secure fit.
Step 7: Secure Back Panels

- Take back panels ⑥ and position them onto the structure.
- Place support bar ⑦ across the top as shown.
- Use screws I (x24) to secure panels ⑥ and ⑦ firmly into place.
- Make sure all screws are tightened evenly so the back panels sit flush without gaps.
Step 8: Install Adjustable Shelves

- Insert shelf supports H (x8) into the desired pre-drilled holes on panels ② and ③.
- Position shelves ④ on top of the supports and make sure they sit evenly.
- Adjust the height of the shelves according to your storage needs before final placement.
Step 9: Prepare the Doors

- Take the two door panels ⑧.
- Attach hinges J (x6) to the pre-drilled spots on each door using screws E (x12).
- Fix the door handles L (x2) to the center of each door with screws as shown.
- Ensure hinges and handles are aligned and tightened securely.
Step 10: Attach the Doors to the Cabinet

- Position the doors ⑧ onto the cabinet frame.
- Secure each hinge J onto the side panels using screws E (x24).
- Follow the hinge adjustment guide (I–V) for alignment:
- (I) Secure hinge with screws.
- (II) Adjust door height.
- (III) Adjust door depth.
- (IV) Adjust side-to-side alignment.
- (V) Fine-tune door spacing.
- Make sure both doors open and close smoothly, and adjust as needed for even alignment.
Final Touches & Care
- Check that all screws, cam locks, and dowels are fully tightened.
- Adjust doors if alignment is uneven.
- Clean with a soft, dry cloth; use a slightly damp cloth for spills.
- Avoid harsh chemicals, abrasives, or bleach.
- Re-tighten screws every few months to maintain stability.
When to Call a Professional
- If major panels arrive cracked, warped, or misaligned.
- If hinges or doors cannot be leveled after adjustment.
- If the cabinet wobbles even after securing to the wall.
- If unsure about drilling into your wall type for anti-tip installation.
Ready for Use
Your HOMCOM 63″ Kitchen Storage Cabinet, 5-Tier Pantry Cabinet with Doors (SKU: 835-540V81TN) is now ready to use. With correct assembly, wall securing, and routine care, it will provide reliable storage and style to your kitchen for years.
You can also download the HOMCOM Kitchen Pantry Cabinet (835-540V81TN) User Manual (PDF) for your future reference.
FAQs
1. How do I fix uneven cabinet doors after assembly?
Use the hinge adjustment screws to level the doors. Adjust height, depth, and side alignment one at a time. Check spacing until both doors open smoothly.
2. What if the cabinet feels wobbly after setup?
Ensure all screws and cam locks are fully tightened. Confirm the cabinet is secured with the included anti-tip kit. Place it on a flat surface to improve stability.
3. How can I prevent shelves from bowing under heavy items?
Avoid overloading shelves beyond their weight limit. Place heavier cookware or jars on the bottom tiers. Distribute weight evenly to reduce stress on the panels.
4. What should I do if screw holes seem too tight or misaligned?
Do not force the screws, as this may crack panels. Loosen surrounding fittings slightly, then reinsert the hardware. If needed, lightly sand edges for alignment.
5. How do I move the cabinet safely after assembly?
Empty the shelves completely before moving. Always lift with two adults rather than dragging to prevent damage. Recheck anti-tip brackets after repositioning.


