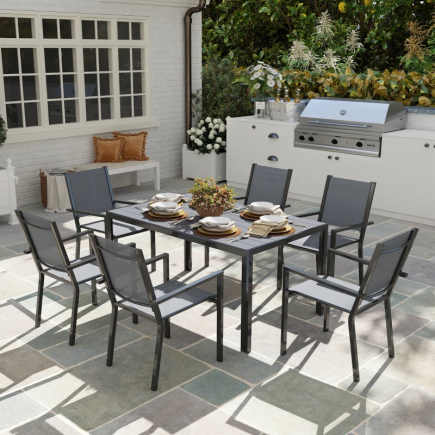


The Extendable Aluminium Outdoor Dining Table is designed to provide versatile outdoor dining comfort with a modern, functional design. The expandable top allows you to effortlessly adjust from a compact table for four to a larger dining space for up to six guests. Crafted with a durable powder-coated steel frame and a slatted aluminium tabletop, it ensures weather resistance, easy cleaning, and long-lasting stability perfect for patios, gardens, and outdoor entertaining.
Parts List
| Label | Description | Quantity |
| A | Main Tabletop Panel | 1 |
| B | Support Beam / Frame Bar | 4 |
| C | Side Support Bracket (Left) | 4 |
| D | Side Support Bracket (Right) | 4 |
| G | Extension Leaf (Center Panel) | 1 |
| H | End Tabletop Panels (Extendable Sections) | 2 |
Hardware Pack
| Label | Description | Specification | Quantity |
| E | Bolt + Washer Set | M6 × 25 mm | 32 (+1 spare) |
| F | Allen Key | 4 mm | 1 |
Before You Begin
- Read all instructions carefully before starting assembly.
- Assembly time: Approximately 60 minutes
- Recommended personnel: Two people
- Assemble on a flat, clean, and padded surface to avoid damage.
- Ensure all parts and hardware are accounted for and undamaged.
- Do not fully tighten screws until all components are correctly positioned.
- This product is intended for outdoor use. Store indoors during extreme weather.
Assembly Instructions
When you are going to assemble your Extendable Aluminium Outdoor Dining Table (SKU-84G-629V00GY), please follow these steps carefully and proceed sequentially.
Step 1 – Attach Leg (B) to Main Tabletop (A)
- Place the main tabletop (A) upside down on a soft, flat surface.
- Position each leg (B) upright at the corners of the tabletop frame.
- Align the holes on the tabletop (A), legs (B), and corner brackets (C).
- Secure each corner bracket (C) between the tabletop (A) and leg (B) using bolts (E).
- Tighten the bolts (E) slightly with the Allen key (F).
- Repeat for all four legs (B).
Step 2 – Attach Support Bracket (D) to Legs (B)
- Keep the table upside down from the previous step.
- Position each support bracket (D) between two adjacent legs (B) at the sides.
- Align the pre-drilled holes on the brackets (D) with the holes on the legs (B) and tabletop frame.
- Insert bolts (E) through each hole connection point.
- Tighten bolts (E) using the Allen key (F) until brackets are firmly secured.
- Repeat this process for all four brackets (D).
Step 3 – Extend Both Tabletop Panels (H)
- Turn the table upright carefully after securing all legs and brackets.
- Hold both ends of the tabletop firmly.
- Pull the tabletop panels (H) outward in opposite directions as shown by the arrows.
- Extend until the center opening is fully revealed for the extension leaf.
- Make sure both sides slide evenly and remain aligned.
- Do not force the panels to ensure the sliding rails move smoothly.
Step 5 – Secure Extension Leaf (G) Underneath
- Keep both tabletop panels extended outward to access the center area.
- Position the extension leaf (G) below the tabletop as shown in the diagram.
- Align the grooves or support rails on the underside of the tabletop with the locking brackets on the leaf.
- Slide the leaf (G) downward into the storage track until it rests securely.
- Ensure the leaf is properly seated and does not move freely during adjustment.
Step 6 – Lower Extension Leaf (G) into Place
- Lift the extension leaf (G) from the stored position carefully.
- Align it above the center opening of the tabletop.
- Lower the leaf gently into the center gap.
- Ensure the locking pins or guides engage fully for a secure fit.
- Check that the tabletop surface is even and all sections align flush.
Step 7 – Attach End Tabletop Panels (H)
- Position both end panels (H) on each side of the tabletop.
- Align the sliding grooves of the end panels (H) with the table frame.
- Carefully push each panel inward until it fits securely against the main tabletop.
- Ensure the panels slide smoothly and meet evenly at the center.
Step 9 – Assembly Complete (Final Check)
- Confirm that both tabletop panels slide smoothly and meet evenly at the center.
- Ensure the extension leaf (G) fits securely and the tabletop surface is level.
- Verify all bolts are fully tightened and the frame feels stable.
- Check that the entire table stands evenly on all four legs without wobbling.
- Wipe the surface clean to remove fingerprints or dust before use.
Operating Instructions
- To extend the table, unlock and pull both end panels outward evenly, then insert the extension leaf (G).
- To collapse, remove the center panel and slide both sides inward until locked.
- Always ensure locking points are engaged before placing items on the tabletop.
Storage and Seasonal Care
- Clean using a soft cloth with mild soap and water.
- Avoid harsh chemicals or abrasive scrubbers that can damage the coating.
- Periodically check and tighten all bolts.
- Keep covered or stored indoors during heavy rain, snow, or winter months.
- Avoid placing extremely hot items directly on the tabletop.
Safety Precautions
- Do not exceed maximum load capacity:
- 70 kg (154 lbs) in the center
- 25 kg (55 lbs) on each extended side
- Ensure all locks are engaged when the table is extended.
- Keep fingers clear of sliding joints during extension or collapse.
- Place the table on a level surface to prevent tipping.
Ready to Use!
Your Extendable Aluminium Outdoor Dining Table is now fully assembled and ready for use.
With its durable aluminium slats, rust-resistant frame, and smooth-sliding expandable design, it’s ideal for family meals, garden parties, and outdoor entertainment.
You can also download a copy of the Extendable Aluminium Outdoor Dining Table (SKU-84G-629V00GY) Manual PDF future reference.
Thank you for choosing HOMCOM crafted for comfort, function, and style.
For technical support, replacement parts, or product questions, contact Aosom LLC’s Customer Service and get friendly assistance.
FAQs
1. What should I do if the extension leaf doesn’t fit correctly?
Check if the panels are misaligned and reposition them before reinserting the extension leaf. Ensure the grooves and locking points are aligned properly.
2. How do I prevent the sliding panels from getting stuck?
Ensure the rails are clean and free from dust or debris. Apply a small amount of silicone lubricant to keep the sliding mechanism smooth.
3. What can I do if the table feels uneven after assembly?
Loosen and re-tighten the bolts evenly to ensure the table is aligned. Check the surface it’s on for levelness to prevent any imbalance.